The objective lens
The objective lens is the most important lens in the whole
microscope.
All the lenses below the specimen serve to magnify the image
of the specimen. Lets just think about the ray diagram shown below.
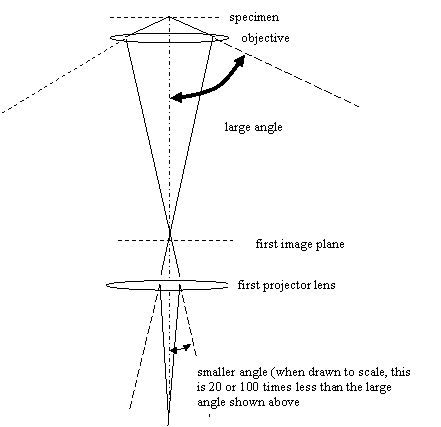
The magnification of objective lens is determined by the
ratio of the distances between its object plane (the
specimen) and its image plane (what we have called ‘the
first image plane’). Think of the levers in that were introduced
in section 3.
But we see that if the magnification is large (and in
practice, it is generally a factor of 20-50), then the range
of angles of rays impinging upon the first image plane is
very small relative to the range the angles entering the
object lens from the specimen. Of course, other lenses
below the objective lens (which are in the projector system)
also magnify, and as the magnification increases, then the
range of angles that each subsequent lens must deal with is
reduced and reduced.
Now, the argument goes like this. Because aberrations are
worse at high angles than at low angles (with haven’t proved
this, but it is generally true), then the lens which will be
most affected by aberrations will be the objective lens,
because it has to deal with biggest range of angles in the
whole microscope. That means that our biggest single
concern in electron microscopy should be to make sure that
the objective lens is perfectly aligned and stigmated. In
fact, if the objective lens is mis-aligned, the errors it
introduces will so huge that no matter what we do with the
other lenses, we will never be able to correct the error.
(In fact, this argument is not the whole story. A little
thought will show that the final lens in the projector
system must be dealing with a rather large range of angles
if it is going to be able to illuminate the whole of the
phosphor screen. However, all of these beams are pencil-
thin rays – they are called principal rays – and the effect
of aberration in the projector system is to distort the
image but not to affect resolution. In a modern microscope,
the projector system is balanced to minimise distortion. To
all intents and purposes, only the performance of the
objective lens really matters.)
Remember: The objective lens is the most important lens.
The condenser lenses are the next most important, because
they determine how the specimen is illuminated with
electrons. The first lens of the projector system
(sometimes called the 'intermediate' or 'diffraction' lens)
is the next most important, and matters a little bit. We can
forget about all the other lenses. Even though they provide
a huge amount of magnification, they have virtually no
influence on our scientific results. (We assume here that the projector
system is aligned OK: this alignment is important for defining the
centre of the phosphor screen, but is usually only
undertaken by the site engineer and is usually pretty stable over months or years. If features
move from the centre of the screen as a function of magnification or camera length, then this
implies that the projector system needs alignment.)
So, how do we align the objective lens?
Well, since the objective lens is the most important lens,
we never choose to align its shift. Instead, we define the
centre of the lens as being on the optic axis. So, that’s
easy: by definition the objective lens is always on-line!
Now all we have to do is line up the rest of the microscope
around the objective lens. To define the line of the optic
axis, we draw an imaginary line between the centre of the
objective lens and the centre of the phosphor screen.
Because the phosphor screen effectively images the first
image plane (via the projector system, which we have agreed
is not very important), the centre of the phosphor screen is
also, by definition, on the optic axis. The shrewd reader
will observe that it must be necessary to align the
objective with the projector system. This is done in a full alignment (both
mechnanically and with the image shift coils), but we
don’t have to worry about it under normal circumstances.
So, what’s left?
All that remains is to get the condenser system shooting the
beam right through the centre of the objective lens and
parallel to the optic axis.
It turns out that the easiest way to do this is to change
the excitation of the objective lens and see if the image
moves. We said it before, but we’ll say it again:
Remember: If you want to test the alignment of a single
lens, alter its setting (i.e. its strength or excitation)
and see if anything moves.
Actually understanding why the image moves if the
illumination is not coming straight and parallel into the
objective lens is not completely easy. Several things are
going on. At this stage, you don’t need to understand this,
so feel to skip to the next ‘Ask the demonstrator’.
Aside: We so far haven’t discussed yet another very
important difference between electron lenses and
optical lens. Electrons lenses rotate their images as
well as focussing and magnifying them. If we adjust a
lens back and forth in strength (which is called
‘wobbling’ a lens), the image will move unless we are
looking at the optic axis of that lens. As a first
approximation (but see next paragraph), this is a good way of steering the
incoming beam onto the optic axis of the objective
lens. What we find is called the ‘current centre’ of
the objective lens. (‘Current’ because we wobble the
current going through the lens.)
Tilting the illumination has other effects. The
direction of the incoming beam makes the pattern of
radiation downstream of the specimen be at an angle
relative to the optic axis. As the objective lens is
changed, we focus on different layers of this radiation
pattern, which will appear to shift laterally because
of the tilted inclination of the illumination. In
fact, to correct this misalignment, it is best to tilt
the illumination back and forth between opposite
degrees of tilt, and try to make the image of something
like a thin carbon film roughly identical at both
illumination angles. What we find is called the ‘coma-
free axis’.
Another thing we could try doing is wobbling the
voltage of the incoming electrons. When their voltage
is changed, their velocity is changed, and so is the
strength of their interaction with all the lenses in
the electron microscope. This is good way of getting
the condensers and projectors all lined up with most
important lens, the objective. What we find, as we
tilt the beam to minimise any image shift, is called
the ‘voltage centre’
.
Yet another important axis is defined by the what’s
called the ‘reversal centre’ of the lens, which is that
point in the image plane that stays stationary when the
current flowing through the objective is reversed.
You would think that the reversal centre would be the
same as the current centre, but in fact if the
polepieces of the objective are not perfectly aligned
to the optic axis (and in practice, they never are)
then there is always a slight discrepancy.
In an ideal
world, the current centre, the coma-free axis, the
voltage centre and the reversal centre would all
coincide. In fact they quite never do. But you don’t
need to worry about these things, unless you are really
pushing for the very highest resolution.
:end of aside
For normal imaging, what we actually do is ‘wobble’ the
strength of the objective lens (make it stronger and weaker
periodically) and adjust the tilt of the illumination beam
(see the figure below) until the image appears stationary.
Ask the demonstrator: To check the condenser alignment and pivot
points and to identify the rotation centre alignment, or
objective wobble, and whatever alters the beam tilt –
probably the same old multi-function knobs. Also ask to be
shown the objective lens stigmator control – probably also
on the wretched multi-function knobs.
Experiment: Looking at a good contrast bright-field image,
say of gold islands on a holey carbon film, focus the image
as well as you can. Try altering the objective stigmator.
The objective stigmator works just like the condenser
stigmator, but because you are now looking at an image, and
not a nice sharp single object, like the filament, it is not
so easy to see what you are doing. Remember to alternate
between focus, stigmator x, focus, stigmator y, focus,
stigmator x, and so on. Try to make the image as clear as
possible. It won’t look good because we haven’t learnt
about the objective aperture yet, which is also important,
and which will also affect the image quality. Just try to
see a reasonably sharp picture.
When the objective stigmators are roughly okay (i.e. there
is no obvious blurring in one direction or another as you
change focus), try wobbling the objective lens. That is to
say, correct the rotation centre. The multi-function knobs
will now affect the tilt of the beam by adjusting the double-
deflection coils between C2 and the specimen. This is the error we are
trying to correct:

It is as if we are physically tilting the whole condenser
system until
the illumination is parallel with the optic axis. Practice
turning the knobs until the image appears stationary. It
may help to do this using the binoculars on the small
phosphor screen. Ask the demonstrator if you don’t know how to
use the binoculars.
At the beginning to this section, the demonstrator checked the
‘pivot points’ before we tried to adjust the rotation
centre. This is an important detail that we shortly have to
learn about, but first lets just think about the position of
the specimen...


Copyright J M Rodenburg
| 