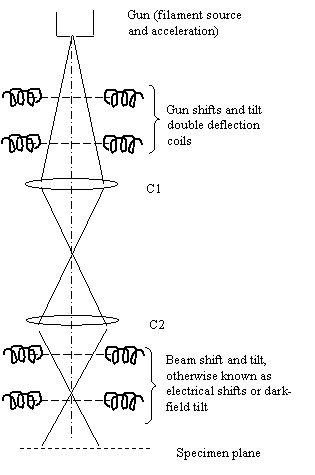
Pivot points
When we tilt the beam, we change the angle of that the
incident illumination coming from the condenser hits the
specimen. By now, you may have noticed that the words
‘tilt’ and ‘shift’ are used in many different contexts in
electron microscopy. We can tilt or shift the specimen,
tilt or shift the gun, tilt or shift lenses or tilt or shift
the illumination. However, in general, when used in
conjunction with the word ‘beam’, then altering ‘beam tilt’
and ‘beam shift’ usually means tilting or shifting the
illumination: in other words, we are adjusting the double
deflection coils below C2 and above the specimen - the lower
set of coils in the picture below, which is all above the specimen plane.
Now lets think in a bit more detail about how the beam tilt
and shift works. As we described before, we have two pairs
of coils for each of two Cartesian co-ordinates. When the
coils are used to either shift or tilt the beam, the two
pairs of coils work in opposite senses, but the ratio of the
individual coil excitations is different for these
operations. Look at the next figure:
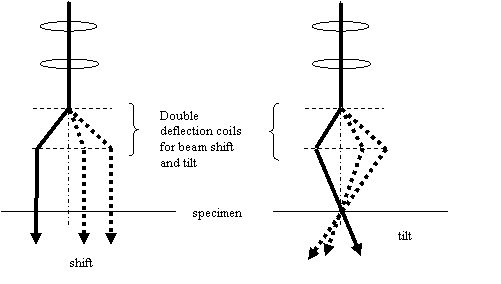
Consider a single ray that starts off travelling down the
centre or the condenser system. If this beam is shifted, it
is laterally displaced but ends up travelling parallel with
the optic axis. If the beam is tilted, it is first bent off
axis, and then bent towards the specimen in such a way that
it goes through the same point on the specimen as it would
have done, but now at an angle.
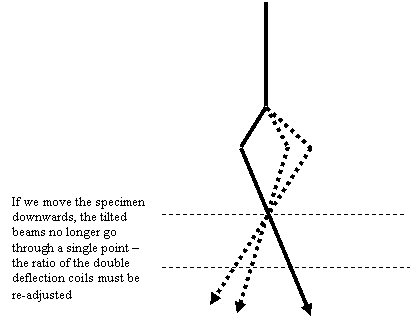
Now think what happens if we were to change the height of
the specimen. The beam shift is not really affected (it is
in fact slightly affected at off-axis points by the
objective pre-field – but just don’t worry about this).
However, the beam tilt is seriously affected because the
lower coil will no longer bend the beam back by the right
amount so that it goes through the same point in the
specimen plane, as shown below.
In a perfect world, beam tilt should just rotate the beam
through a point in the specimen, like a lever pivoting about
a point. This process is sometimes called rocking the beam
about a ‘pivot point’ or ‘rocking point’. Anyway, because
it depends on specimen height, then whenever you change the
specimen height, you must re-adjust the pivot points (also
known as rocking points – the term rocking point is more
often applied to situations where the beam is scanned
through all tilt-angles, as in certain specialised forms of
electron diffraction).
Most modern electron microscopes have a very easy way of
doing this. There is usually a button for ‘pivot points’
which makes the beam jump between two tilt settings. If the
pivot points are wrong, you see two beams separated
laterally: just two blobs of intensity on the phosphor screen. It is then a simple matter to adjust the two
correction knobs (which may well be the multi-function knobs
again) until the two beams are coincident. The correction
knobs adjust the ratio of excitation of the two sets of
deflection coils. There are two ratios, because sometimes
the x- and y- coils have cross-talk between them as a result
of residual misalignment and the rotation effects of the
objective pre-field. Don’t worry about details: just get
the beams coincident. You have to do this twice – for both
x- and y- tilts.
Ask the demonstrator: Show me how to adjust the pivot points.
Experiment: Repeat the previous experiment, changing the
specimen height and the objective focus. Check the pivot
points. Change specimen height again and focus, and recheck
the pivot points. Try changing the objective excitation
(focus) with the pivot point adjustment still on, preferable
through a hole in the specimen. You should find that the
separation of the two blobs of intensity varies as a function
of objective defocus. Of course, as far as the correction of the
pivot points is concerned, the actual
specimen height is not important compared to the objective
excitation. Why? Can you draw a ray diagram?
Some manufacturers’ manuals advise you to adjust the focus
of the objective lens so that the double images of the
specimen during the pivoting process merge into one image.
If you have some spare time, you could try to work out why
this works. (Think of the illumination on the specimen
casting a shadow below it: as the beam tilts, the shadow is
cast at different angles, which affects where it appears in
the first image plane.)
All the double-deflection coils in the TEM have their own pivot points for both
'shift' and 'tilt' - indeed, the only difference between tilt and shift is the ratio of the excitation of
the two sets of coils. As an ordinary user, the only pivot point you commonly
adjust is the illumination tilt (or simply 'beam tilt'), as above. The pivot points of the gun and image
alignment coils are adjusted by the site engineer (or simply even just set in the
factory). A full alignment of the column involves adjusting the image pivot points,
but this process is normally disguised as part of a lengthy alignment sequence. As
an ordinary user, only the illumination tilt is important.
However, if you want to do something clever, like good quality STEM imaging, you may
have to worry about pivot points in more detail. By the way, the terms tilt purity and shift
purity are just ways of saying that pivot points have been correctly set to introduce a
pure tilt or a pure shift. The tilt point for pure shift is at infinity (parallel lines never meet).


Copyright J M Rodenburg
| 