The gun
11am
When you come back to the microscope,
Ask the demonstrator: Let me turn on the electron beam.
In the first section you were read the ‘riot act.’
You then learnt about quite a few different knobs. To
remind ourselves, lets list them:
- Brightness: control of the strength of C2
- Electrical shifts x and y: For shifting the illumination
- Mechanical alignment of the condenser aperture.
- Specimen shift
- Focus: control of the strength of the objective lens
- Magnification: controlling the magnification between the image plane and the phosphor screen
- Focus step size: for controlling how much the objective excitation changes with each click.
- Fine focus button on brightness: for getting more sensitive control over C2
- Condenser aperture size: for selecting different sizes of condenser aperture
- Selected area aperture: an aperture located in the first image plane.
All these controls are pretty innocuous: if you put them all
wildly out of line, it will take whoever next uses the
microscope a bit of time (5-20 mins) to get everything back
to normal.
The filament control is much more dangerous. In fact, all
you have to do is turn it up too high, and the filament will
just burn up. It then takes several days to get the
microscope working again at all. If the filament is a LaB6,
it will cost about a thousands pounds to buy a new one, and
so…
The demonstrator says: “Be careful and do exactly what I say:
until I explicitly give you permission, you must never
attempt to turn up the filament on your own.”
It sounds frightening, but you have to be told. Turn up the
filament slowly. Never, never over-ride the ‘filament
limit’, either on the computer or physically on the knob,
unless the person who is responsible for running the
microscope (and will have to change and pay for a new
filament if you make a mistake) has given you permission to
do so.
The filament or source - the first thing we ever made an
image of in the microscope - is part of what is called ‘the
gun assembly.’ The gun shoots electron down into the
microscope. It’s worth having some idea how it works.
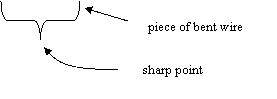
The filament is a bent wire with a point sticking out at the
bend, like this:
Think of it like a filament in an ordinary light bulb. A
LaB6 filament has an orientated pointed crystal of lanthanum
boride stuck onto the sharp pointed tip. LaB6 makes a much
brighter source of electrons than an ‘ordinary’ tungsten
filament, but it is much more expensive and sensitive (hence
the ‘riot act’ above).
Your microscope might have field-emission gun (‘FEG’), which
works in a completely different way to what we describe
below. At this stage, you do not need to know anything further about FEGs (this comes much later).
The filament is heated by passing a current through it: the
filament control adjusts the heating current. When the
electrons inside the filament get hot, they can burst out of
the filament into free space.
In front of filament is a surface of metal with a hole in
it. The hole is mounted directly below the filament. The
metal surface forms a cup around the filament and, for
historical reasons, is called the ‘Wehnelt’. The Wehnelt is
electrically connected to the filament through a variable
resistor. When a lot of current comes out of the filament,
the resistor has the effect putting a voltage on the Wehnelt
which limits the amount of current that can come out of the
filament. This all has the effect of stabilising the beam
intensity, which would otherwise flicker the whole time.
You can change the setting of the variable resistance to
make more current come out of the filament.
Ask the demonstrator: To show you how to change the variable
resistance between the Wehnelt and the filament.
The demonstrator will show a knob, or perhaps a computer-
controlled input, which is called ‘bias’ or ‘emission’
depending on the make and type of the microscope.
The demonstrator will probably read yet another ‘riot act’,
saying you must never turn up the emission without
permission. The reason is that more emission makes the
filament burn out more quickly than it would do otherwise.
Never turn up the emission without first seeking permission
from the person who runs the microscope.
Below the Wehnelt there are a series of anodes - rings with
holes in them - which have increasingly positive voltages on
them. The anode(s) accelerate the electrons to their
working energy of 100keV-400keV.
Ask the demonstrator: How do I control the keV of the electrons?
Until you are experienced, you will always run the
microscope at the usual voltage - whatever that may be -
usually 200keV for an ‘ordinary’ TEM. However, when you
learn to switch on the microscope on a new working day, you
may have to check that the voltage - usually called the ‘HT’
(for ‘high tension’) - is on and working at the right value.
Ask the demonstrator: How do I switch off and on the HT?
The demonstrator will show you a button, and read the ‘riot act’
again.
Sometimes, when you are using the microscope, the HT will
switch off automatically. The microscope senses how much
current is going out of the gun assembly. If a bit of
contamination gets into the gun, it can spark over (or
‘flash over’), which means a spark flies between the Wehnelt
and the anodes, in which case the HT will switch itself off.
If this ever happens to you, don’t just switch the HT on
again. Go and ask the advice of the person who runs the
microscope.
In summary, the electrical connections of the gun look like
this:
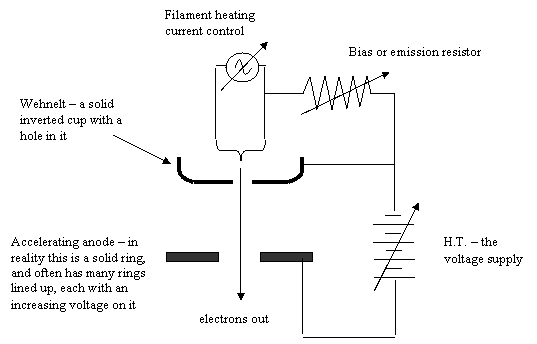
Remember: There are three main variables that control the
gun. The filament current, the feedback resistance (called
‘emission’ or ‘bias’), and the accelerating voltage called
the HT.
Okay, that’s enough about the gun for the time being.


Copyright J M Rodenburg
| 